How to Make a Cell Bigger in Microsoft Excel
Our guide continues below with additional information on how to enlarge cells in Excel, including a variety of other ways to accomplish this. While learning how to autofit all columns in Excel is a nice and simple method for resizing cells according to your data, it may not always be the solution. Making cells bigger in Excel 2010 is something that can be done using a couple of different methods. The first and simplest method involves increasing the width of the column that contains the cell or increasing the height of the row containing the cell. You can also perform both of these actions if you need to increase a cell in both directions. However, this will also increase the size of the rest of the cells in that row or column. If you want to make an individual cell larger without increasing the size of the surrounding cells, then you need to merge several cells together. The choice is up to you and can vary depending upon the situation. If you want to make a lot of cells bigger at once, then our guide on how to expand all rows in Excel might be the answer that you need.
Increasing Cell Sizes in Excel 2010 (Guide with Pictures)
The first option that we are going to go over is increasing the width of a column. You can choose to either manually set the width of the column, or you can choose to automatically size the column based upon the largest amount of data contained within a cell in that column.
Automatically Set Column Width
Step 1: Open the spreadsheet containing the cell that you want to enlarge. Step 2: Position your mouse cursor on the right border of the column heading in which the cell is located. In the example image below, my cell would be located in column E. Step 3: Double-click your mouse to automatically resize the column.
Manually Set Column Width
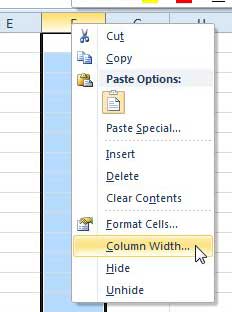
Step 1: Make sure that the spreadsheet is open in Excel. Step 2: Right-click the column heading containing the cell that you want to enlarge, then click the Column Width option. Step 3: Type a value for the width into the field at the center of the window. The default size is 8.43, so increase the size accordingly. Step 4: Click the OK button to apply the width and resize the column.
Automatically Set Row Height
Step 1: Make sure that the spreadsheet is still open in Excel. Step 2: Position your mouse cursor on the bottom border of the row containing your cell. In the example image below, my target cell would be in row 14. Step 3: Double-click your mouse to automatically resize the row based on the cell containing the largest data.
Manually Set Row Height
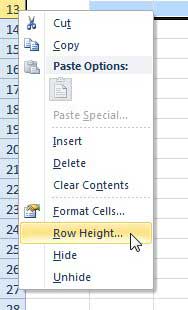
Step 1: Open the spreadsheet in Excel. Step 2: Right-click the row heading containing the cell that you want to enlarge, then click the Row height option. Step 3: Type your desired row height into the field at the center of the window (the default value is 15), then click the OK button to resize the row.
How to Merge Cells
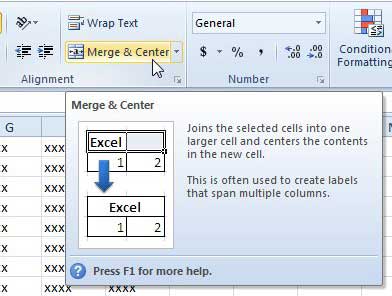
Step 1: Locate the cell that you want to enlarge. In order for you to merge cells without disrupting data in surrounding cells, you are going to need to make sure that the cells surrounding your target cell are empty. Step 2: Use your mouse to select all of the cells that you want to merge into one. Step 3: Click the Home tab at the top of the window. Step 4: Click the Merge and Center button in the Alignment section of the ribbon at the top of the window. Using one of the methods described above should help you to solve your problem of how to enlarge cells in Excel. If you would like further information on changing cell sizes in Excel 2010, you can read this article.
Summary – How to expand cells in Excel
Automatically adjust column widthManually set the column widthAutomatically adjust the row heightManually set the row heightMerge and center multiple cells
If you are in the market for a new laptop and want something that will run Excel well, you should check out the Microsoft Surface Pro. Not only does it have a ton of awesome features, but it is priced very reasonably for a machine that is built for both performance and portability.
Additional Sources
After receiving his Bachelor’s and Master’s degrees in Computer Science he spent several years working in IT management for small businesses. However, he now works full time writing content online and creating websites. His main writing topics include iPhones, Microsoft Office, Google Apps, Android, and Photoshop, but he has also written about many other tech topics as well. Read his full bio here.
You may opt out at any time. Read our Privacy Policy


