The same rule applies to entire worksheets in Excel, and one of the things you can edit in bulk are headers. You can add the same header to multiple worksheets in an Excel spreadsheet by right-clicking on a tab and choosing Select All Sheets, then going to the Page Layout tab and clicking the Page Setup button. You can then choose the Header/Footer tab and add your header information. It’s very common to have multiple worksheets in the same Excel workbook. Excel even includes multiple worksheet tabs in new workbooks by default, and you can add or remove worksheets by simply using the tools at the bottom of the window. Often you might be working with a larger report, but need to work on individual parts of it separately. For example, if you have a report that you complete weekly or monthly, you might have a tab for each report within the same Excel file. However, these individual worksheets might all need to be printed with headers, and the same header can be used for each worksheet. Even if you are simply copying and pasting the same thing to each sheet, there are a surprising number of steps involved to add information to an Excel header. Repeating actions like this in Excel can waste a lot of time when you add everything up, and you might be looking for ways to make yourself more efficient and automate some of those tasks. Fortunately, there is a way to apply a header to every worksheet in your workbook at the same time by first selecting all of the worksheets, then simply creating the header on one of them. This change will then be applied to each worksheet in your workbook.
How to Apply a Header to All Worksheets in Excel 2013
Our guide continues below with additional information on using a custom header on multiple sheet tabs in Excel, including pictures of these steps.
How to Apply Header to Multiple Excel Worksheets at Once (Guide with Pictures)
The steps in this article are going to show you how to select all of the worksheets in your workbook and apply the same header to each of those worksheets.
Step 1: Open the workbook containing the worksheets that you want to modify.
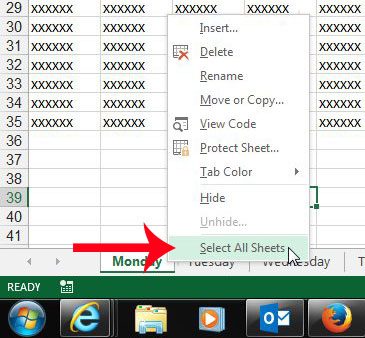
Step 2: Right-click on one of the sheet tabs at the bottom of the window, then click the Select All Sheets option.
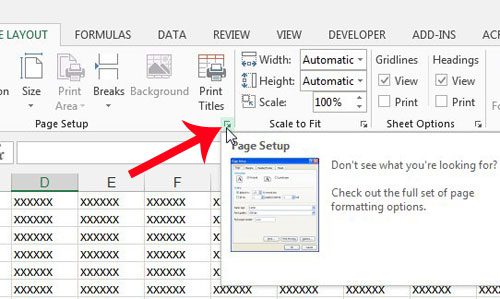
Step 3: Click the Page Layout tab at the top of the window.
Step 4: Click the small Page Setup button at the bottom-right corner of the Page Setup section in the navigational ribbon.
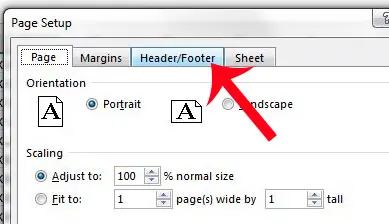
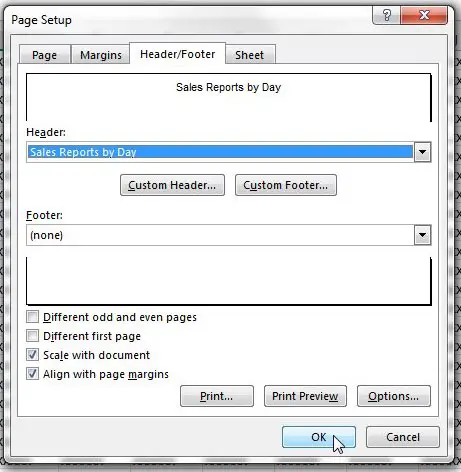
Step 5: Click the Header/Footer tab at the top of the window.
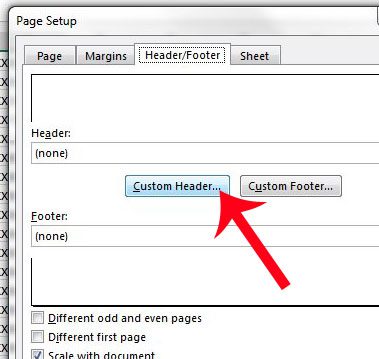
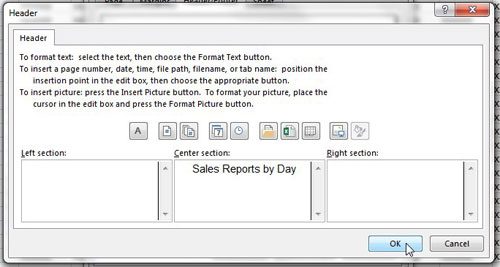
Step 6: Click the Custom Header button.
Step 7: Add your header information to the appropriate section, then click the OK button.
Step 8: Click the OK button at the bottom of the Page Setup window.
Note that you can also click the Custom Footer button header and add information to the footer box if you would like to apply the same information to multiple worksheet footers as well. If you go to File > Print you can see a Print Preview of how everything will look so that you can confirm that any header and footer elements you have created are appearing on each of the worksheets you selected. Our tutorial continues below with additional discussion on applying headers to multiple worksheets in Excel.
More Information on How to Make the Same Header Change to Multiple Microsoft Excel Worksheets
In the section above we used a shortcut to select all of the sheets in our workbook. This is great when you, in fact, want to select all of your worksheets, but it doesn’t help if you only need to select some of them. You can select more than one worksheet tab at a time by holding down the Ctrl key on your keyboard, then clicking each of the worksheets that you need to edit. Once all of the worksheets are selected you can follow the same steps above to apply the same header change to all of them. The Page Setup dialog box above where you found the option to customize your header or footer includes some other useful tabs as well. If you click on the Sheet tab you are able to configure different settings that affect the way your sheet prints, such as repeating a row at the top of every page. Another way that you can customize your header in Excel is to go to the View tab, then choose Page Layout View. You can then double-click inside of the header or the footer and customize them that way. Are your worksheets printing a lot of extra pages, but there are only one or two columns on each of those pages? Learn how to fit all of your columns on one page so that you do not need to manually adjust columns to fix this problem.
Additional Sources
After receiving his Bachelor’s and Master’s degrees in Computer Science he spent several years working in IT management for small businesses. However, he now works full time writing content online and creating websites. His main writing topics include iPhones, Microsoft Office, Google Apps, Android, and Photoshop, but he has also written about many other tech topics as well. Read his full bio here.
You may opt out at any time. Read our Privacy Policy